

A great way to view and understand your building or repair project before you get started. Find out just about everything you need to know by watching the video below.
With proper attention to surface preparation and material selection, durable repairs can be made to worn, scaling or cracked surfaces, extending the life of the concrete.
When working with cement-based products, always wear eye protection and waterproof gloves. QUIKRETE Vinyl Concrete Patcher or QUIKRETE Concrete Patching Compound may be used.
Step 1
Clean the surface of the damaged area by removing any loose material such as dirt, oil, or grease and unsound or flaking concrete.
TIP: unsound or flaking concrete can be removed by using a hammer and chisel or with a masonry grinding disk and a portable drill.
Step 2
Scrub and clean the surface of the repair area with a stiff bristle brush.
Step 3
Thoroughly rinse the repair area after cleaning.
Option A: QUIKRETE Vinyl Concrete Patcher
Step 4a
Mix Vinyl Concrete Patcher by adding about 10 ounces of water per 5 pounds of Vinyl Concrete Patcher (the Vinyl Concrete Patcher should be poured into the mixing water).NOTE: the more water that is added during the mixing process, the weaker the bond strength and compressive strength will be.
Step 5a
Mix the Vinyl Concrete Patcher for 3 to 5 minutes using a margin trowel. After a lump-free consistency is achieved, allow the mix to sit undisturbed for about 5 minutes.Step 6a
Prior to applying:
- Remix the Vinyl Concrete Patcher; additional water may be added in small amounts to achieve a putty consistency.
NOTE: it is important not to add more water after the material has begun to set.
- Dampen the repair area with enough water to saturate the surface (any standing water should be removed).
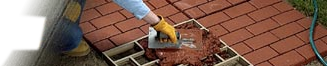
Step 7a
Apply the patcher in layers using a margin trowel; the first layer should be pressed into the repair area using firm trowel pressure.Step 8a
Smooth the surface of the patch so that it is level with the surrounding concrete (avoid adding water to the surface of the patch).Step 9a
The repair area should be protected from foot traffic for 24 hours and vehicle traffic for at least 3 days.
Option B: QUIKRETE Concrete Patching Compound
(Use for non-structural, small aesthetic repairs to concrete; should only be applied when temperatures are between 50 and 90 degrees.)
Step 4b
Stir Concrete Patching Compound using a margin trowel or putty knife.Step 5b
Spread and texture the concrete patch to match the surrounding concrete.NOTE: for patches or cracks over ¼-inch thick Concrete Patching Compound should be applied in multiple layers, allowing each layer to dry before applying the next. For a smooth finish, wet the trowel.
Step 6b
Concrete Patching Compound will begin to form a skin in about 20 to 40 minutes and will harden completely in 1 to 2 hours.